Lab Specimen Transport Bags: Ensuring Safe Specimen Transportation
 Lab specimen transport bags are a critical component in safely transferring medical samples from collection sites to laboratories. Proper use of these bags, along with adherence to guidelines (including WHO recommendations), ensures that specimens arrive intact and uncontaminated for accurate diagnosis. This guide answers common questions about specimen transport, covering what these bags are, how to use them, WHO guidelines, step-by-step transport procedures, and special considerations for blood samples – all with a professional focus for hospital procurement staff, lab technicians, and medical professionals.
What Is a Specimen Transport Bag (Specimen Pouch/Sample Bag)?
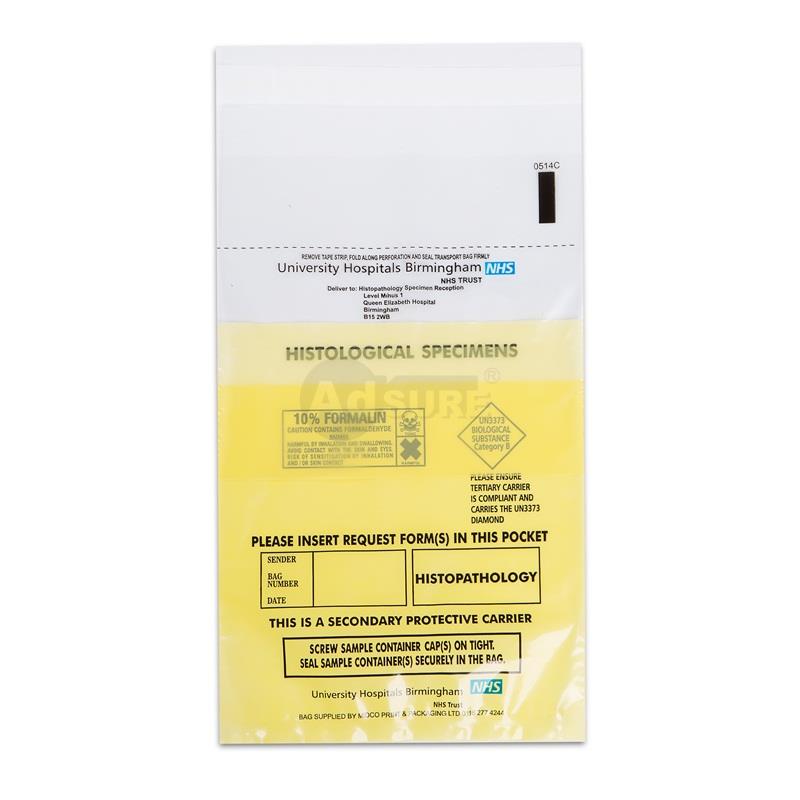
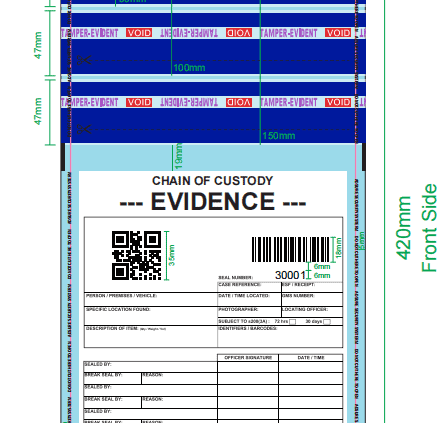
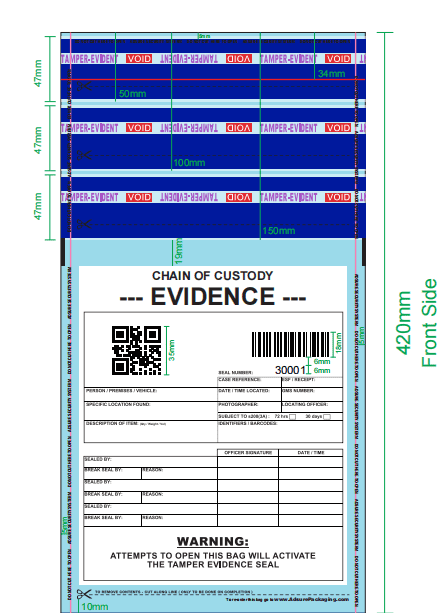
A typical biohazard specimen transport bag with a separate pouch for paperwork. Such bags feature clear instructions for use, a biohazard symbol, and checkboxes for temperature requirements.
A specimen transport bag (also called a biohazard specimen bag, sample bag, or specimen pouch) is a specialized leak-resistant plastic bag used to safely contain and transport biological specimens (blood, urine, swabs, etc.) between collection and the lab. These bags are usually made of durable LDPE plastic and are designed with either a three-wall or four-wall construction – meaning they have a primary pouch for the specimen and a separate attached pouch for paperwork like lab requisition forms. The separate document pouch keeps important paperwork dry and accessible during transit, preventing it from contact with the sample.
Specimen transport bags typically display the biohazard symbol prominently, alerting anyone handling the package that it contains potentially infectious material. They come with a secure sealing mechanism (such as a zip-lock or tamper-evident adhesive seal) to prevent leaks or spills. In fact, many high-quality specimen bags have tamper-evident features that add an extra layer of security, ensuring the bag hasn’t been opened or tampered with in transit. The materials are leak-proof and puncture-resistant, which protects healthcare personnel, couriers, and the public from exposure. These bags are usually single-use and disposable to avoid cross-contamination between samples.
In summary, a specimen transport bag or pouch is a safety device that meets regulatory standards for transporting clinical specimens. It keeps the sample contained, maintains sample integrity, and displays required labeling – all of which are essential for compliance and biosafety in medical sample transport.
How to Transport Lab Specimens Safely
Safe specimen transport requires following proper protocols for packaging, labeling, and handling. Whether you are a lab technician sending samples to the hospital lab or a courier moving specimens between facilities, the fundamental practices are similar:
- Use Personal Protective Equipment (PPE):Always treat patient specimens as biohazardous. Wear appropriate PPE (e.g. gloves, lab coat) when handling and packing specimens. This protects you from exposure and prevents sample contamination.
- Leak-Proof Primary Container:Ensure the specimen is in a tightly sealed primary container (such as a blood tube with a secure cap or a screw-capped specimen cup). Wipe the container exterior if it’s soiled, and make sure no leakage can occur.
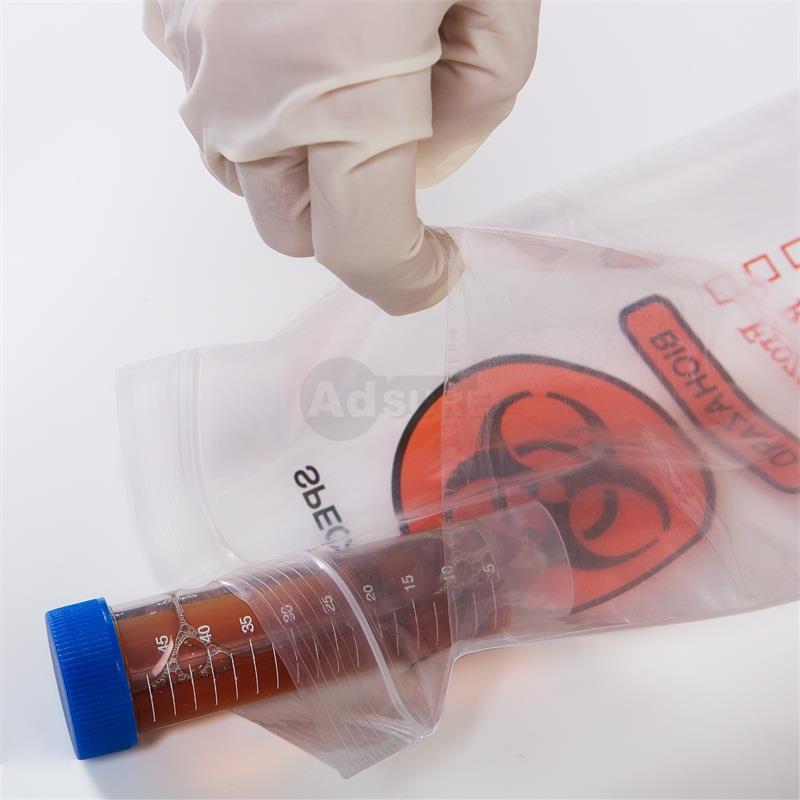
- Place in a Biohazard Specimen Bag:Put the primary container into a biohazard-labeled specimen transport bag for secondary containment. The bag provides a second layer of leak-proof protection. It should display the biohazard emblem and have a proper closure (zipper or adhesive seal). All samples going to the lab must be enclosed in these special bags to comply with safety guidelines. This step greatly minimizes the risk of spills during transport.
- Include Documentation Properly:Fill out the lab requisition form or any required paperwork with patient details and tests needed. Place documents in the bag’s outer pouch, not in the main compartment with the specimen. Keeping paperwork separate (in an attached exterior pouch) prevents it from being contaminated by the sample and ensures lab staff can access forms easily without touching the specimen itself. (Contaminated or missing paperwork can lead to sample rejection, so this is important.)
- Temperature Control:Be aware of the temperature requirements for the specimen. Some samples (like routine blood tests or certain swabs) can be transported at room temperature, whereas others (e.g. chemistry panels, blood gases) may need refrigeration at 2–8°C, and some need freezing. Use insulated coolers or ice packs for specimens that require cold transport. For example, blood samples often must be kept cool (but not frozen) to preserve their integrity. Always check the test’s requirements – improper temperature can degrade the sample.
- Minimize Transit Time:Transport specimens to the lab promptly. Delays can cause specimens to deteriorate or become invalid for testing. Guidelines emphasize shipping or delivering to the lab as soon as possible so that the sample is still fresh when analyzed. For instance, some samples have stability limits (certain tests must be run within hours of collection). Expedite STAT specimens using designated urgent transport (many hospitals use special red or purple STAT biohazard bags to flag urgent samples).
- Handle with Care:Avoid shaking or dropping specimens. Carry the specimen bag upright (especially for blood tubes to prevent hemolysis). If transporting multiple samples, keep them cushioned and secure to prevent breakage. In hospitals, pneumatic tube systems or robotic couriers may be used for rapid transport, but they have restrictions – for example, do not send certain delicate or large-volume samples through pneumatic tubes as they could leak or become agitated. Always follow your facility’s policies on what can be safely transported via tube or requires hand-delivery.
- Maintain Chain of Custody:If handing off to a courier or another staff member, ensure proper logging or tracking. Many labs use specimen tracking systems (barcodes or electronic logs) to document the hand-off and receipt of samples. This chain-of-custody process maintains accountability so that every specimen is traceable from collection to testing.
By following these practices – using the right packaging, labeling clearly, controlling temperature, and minimizing delays – you can transport lab specimens safely and preserve their quality. Properly transported specimens lead to accurate lab results and better patient care.
WHO Guidelines for Specimen Transport (Triple Packaging System)
When transporting specimens, especially if they are potentially infectious or being shipped between facilities, it’s crucial to follow international guidelines. The World Health Organization (WHO) and other regulatory bodies like the CDC and IATA have well-defined standards for specimen transport to ensure safety and compliance.
A core principle in these guidelines is the “triple packaging system.” In fact, WHO recommends using a triple-layer packaging approach for all infectious or diagnostic specimen shipments. This system consists of three layers:
- Primary Container:The leak-proof primary receptacle that directly contains the specimen (e.g., a blood tube, urine cup, swab vial). It must be sealed tightly and cushioned if glass or fragile. An absorbent material (pad or paper) is usually placed around the primary container, sufficient to absorb the entire contents in case it leaks.
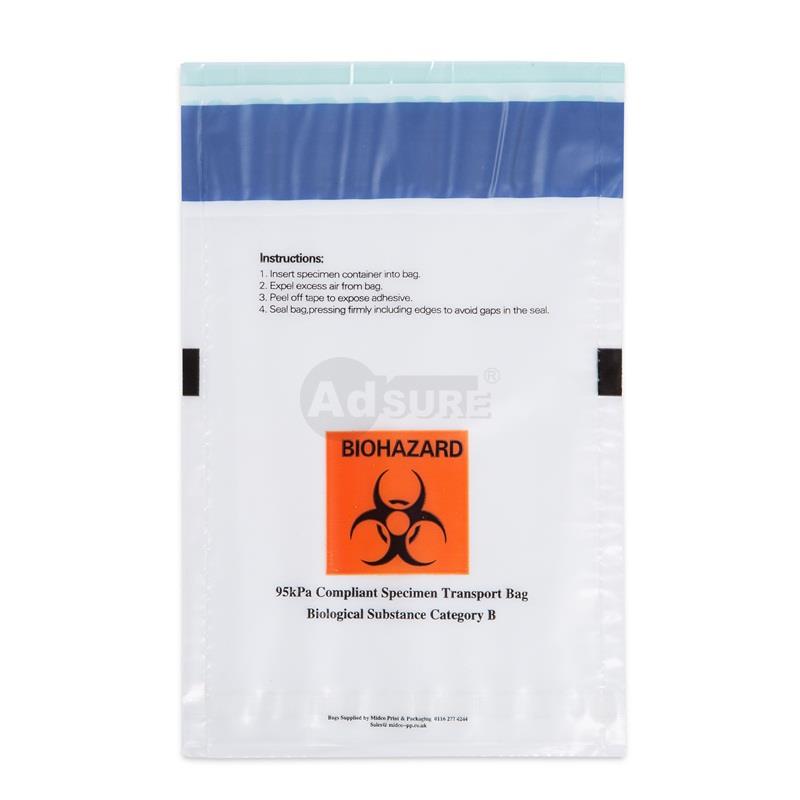
- Secondary Container:A durable, leak-proof secondary packaging – this is typically your specimen transport bag or a screw-capped plastic container. The primary container goes inside this secondary layer along with the absorbent. The secondary container provides another barrier against leaks. It should be labeled with the biohazard symbol (if not already on the primary). For air transport, the secondary packaging for infectious substances often needs to withstand pressure differential (95 kPa) – many certified specimen transport bags meet this 95 kPa pressure requirement for air shipment.
- Tertiary Container (Outer Packaging):A sturdy outer package that protects the sample during transit. This could be an insulated cooler box, a rigid fiberboard or plastic shipping box, or a specialized mailer. The outer package is what you hand to the courier or shipping service. It must be clearly labeled and marked according to regulations – for example, Category B infectious specimens should have the UN 3373 diamond label and proper shipping name “Biological Substance, Category B” on the outer package. The outer packaging also carries the sender and recipient addresses and any necessary temperature labels (e.g., “Keep Refrigerated”) or dry ice labels if applicable.
The triple packaging system is required for infectious substances and strongly encouraged for all specimen transport because it greatly reduces the risk of a spill or exposure in transit. If the primary leaks, the secondary bag contains it; if the secondary somehow leaks, the sturdy outer container prevents release. This layered protection is a best practice endorsed by WHO and reflected in regulations like the IATA Dangerous Goods Regulations.
WHO guidelines also stress proper training and classification. Personnel handling and shipping specimens must be trained in safe practices and in classifying specimens correctly (e.g., knowing whether a sample is Category A, Category B, or exempt). Category A (highly dangerous pathogens) have stricter packaging and documentation requirements, whereas Category B (the vast majority of routine lab samples) can be shipped under the UN 3373 rules with certified packaging. Always refer to the latest WHO guidance and your local regulations for details, but in summary, follow the triple-packaging rule, label everything clearly, and ensure compliance with all hazard communication standards. These steps are essential for safe and legal specimen transport across labs and borders.
Steps of Proper Sample Transportation (From Collection to External Lab)
When transporting specimens to an outside laboratory or any external facility, it’s important to follow a structured process. Below are the general steps involved in preparing and transporting a specimen sample properly:
- Collection and Identification:Collect the specimen using the correct technique and container for the test (e.g., use the proper blood tube with anticoagulant for a blood test, sterile cup for urine, swab in transport medium for cultures). Immediately label the primary container with patient name, ID, date/time, and specimen type. Proper identification is critical to avoid mix-ups.
- Secure the Primary Container:Ensure the container is sealed tightly (caps or lids screwed on, no cracks or drips). If the container has an external surface that became soiled, wipe it clean and disinfect the outside. This prevents any biohazard leakage. Verify that the collection tube or media is not expired – using unexpired, intact collection materials is necessary for valid results.
- Place in Specimen Transport Bag (Secondary Packaging):Insert the primary container into a biohazard specimen transport bag along with an absorbent pad. Seal the bag securely (zip it closed or ensure the adhesive strip is fully sealed). The absorbent material will contain any spills if the primary tube breaks or leaks. The biohazard emblem on the bag should be visible as a warning.
- Add Documentation:Complete the laboratory requisition form or shipping manifest with all required information (patient details, tests ordered, clinical information, billing, etc.). Place this paperwork in the outer document pouch of the specimen bag (or attach it to the outside of a hard container). Do not put paperwork inside the same compartment as the specimen to avoid it getting stained or lost. Ensuring the paperwork is accurate and accompanies the sample is crucial for the receiving lab to process the specimen without delay.
- Prepare Outer Packaging:If sending to an outside lab (via courier or mail), put the sealed specimen bag into an appropriate outer container. This may be an insulated cooler box, a Styrofoam container with a cardboard outer, or a UN-certified shipping box depending on what is required. Add cool packs or dry ice around the specimen bag if the specimen needs refrigeration or freezing. (Use dry ice only for frozen specimens and follow dry ice handling labels, since dry ice in a sealed container needs venting.) Make sure the secondary bag is secured so it won’t rattle around – add padding if necessary.
- Label and Mark the Outer Package:Clearly address the outer package with the destination lab’s name and address and your return address. Affix all necessary hazard labels. For example, if the sample is classified as Biological Substance, Category B, attach a UN 3373 diamond label on the outer box. Also include labels for orientation (arrows if required), and note if it’s perishable or requires specific handling (like “Keep Refrigerated” or “Dry Ice” with net weight). Include an itemized packing list or inventory of contents if shipping multiple specimens. Missing or incorrect labels and documentation can lead to carrier refusal or delays, so double-check this step.
- Choose an Appropriate Transport Method:Send the package by a reliable courier or delivery service that handles medical specimens. Many hospitals have dedicated medical couriers or utilize overnight shipping for lab samples. Make sure the transport timeframe meets the specimen’s stability requirements – e.g. use overnight or same-day delivery for specimens that are time-sensitive or temperature-sensitive. If using ground or air courier, follow their instructions for specimen category paperwork (some Category B shipments require a simple written declaration, whereas Category A shipments require a formal Dangerous Goods declaration and trained personnel to sign it).
- Maintain Cold Chain (if needed):Throughout transport, ensure that any required temperature conditions are maintained. For instance, blood or plasma samples often must stay cold (2–8°C). Use sufficient gel packs or dry ice to last the duration of transit. A single small ice pack may not be enough for long trips, so pack ample coolant or use validated shipping containers that keep the temperature range stable. If multiple specimens with different temperature needs are shipped together, separate them accordingly (e.g., keep frozen items with dry ice separate from refrigerated items to avoid freezing the ones that shouldn’t freeze).
- Documentation and Tracking:Provide any required shipping documents to the courier (air waybill, etc.) and keep copies. It’s wise to track the shipment – note the tracking number and monitor delivery. Maintain a record of when the specimen was sent. For legal chain-of-custody (in cases like forensic samples or certain clinical trials), have signatures at pickup and delivery. Ensure the receiving lab is aware the specimen is coming (sometimes senders call ahead for critical samples).
- Confirmation of Receipt:Finally, confirm that the outside laboratory received the specimen in good condition. Many labs will notify you if a sample is compromised on arrival. If you don’t get results in the expected time, follow up in case the package was delayed or there was an issue. This closes the loop and ensures any problems in transport can be addressed immediately (e.g., recollection if a sample was ruined).
By following these steps, you cover the general process of specimen transportation. Key points are speed, temperature control, and proper packaging/labeling at every step. As one state laboratory guidance sums up: ship specimens promptly (don’t let them sit around), keep them at required temperature, and never compromise on correct packaging and labeling. This diligence ensures that when specimens reach the outside laboratory, they are viable for testing and compliant with all regulations.
What Is the Appropriate Method for Transporting Blood Specimens to the Laboratory?
Transporting blood specimens requires special attention because blood is a delicate sample that can degrade or clot if mishandled. Here are the key considerations for blood samples:
- Temperature Requirements:Most blood specimens (for routine hematology, chemistry, etc.) should be kept cool, between 2–8°C, during transport. This is usually achieved by placing the blood tubes in a cooler with refrigerated gel packs. Keeping blood at refrigerator temperature helps preserve cell morphology and chemistry analytes. Do not freeze whole blood unless instructed (freezing can cause red cells to hemolyze and rupture). Some specialized blood tests may be transported at room temperature or on ice – always follow the test instructions. As a general rule, “keep them cool but not frozen.”
- Use of Specimen Bags:Just like any other specimen, put blood tubes in a biohazard specimen transport bag for leak protection. Blood poses a biohazard risk, so this step is critical. Ensure each tube is properly labeled and secured. If transporting multiple blood tubes, consider wrapping them or using a holder so they don’t knock against each other (to prevent breakage).
- Preventing Clots and Hemolysis:If the blood draw was collected in tubes with additives (like EDTA, citrate, etc.), gently invert the tubes the required number of times to mix anticoagulant. When transporting, avoid excessive shaking or vibration – jostling can cause hemolysis (breakdown of red cells) which ruins the sample. Couriers should keep the blood specimens upright and handle the package gently. Pneumatic tube systems, if used, should be evaluated because the shock from tubes can sometimes cause hemolysis; many hospitals have policies on which blood tests can or cannot go by tube. For off-site transport, driving smoothly (avoiding extreme temperatures in the vehicle) also helps maintain sample quality.
- Time to Lab:The sooner blood reaches the lab, the better. For example, blood samples for routine testing are often recommended to be tested within 2 hours of collection for optimal results (especially for components like cell counts or potassium levels). Always aim for the fastest transport feasible for blood. Use STAT labeling and fast couriers for urgent blood tests. Delays can lead to clotting (in tubes without anticoagulant) or changes in analytes. Some blood tests have specific maximum transport times (e.g., coagulation tests might require testing within a few hours). So, dispatch blood specimens promptly and communicate if any are priority.
- Insulated Transport (if needed):If blood must be kept cold, use an insulated bag or container. In a hospital setting, blood tubes may be transported in rack holders inside insulated pouches. For external transport, an insulated cooler with gel packs is standard. Make sure blood is not placed directly on dry ice unless it’s specifically to be frozen plasma – whole blood on dry ice will freeze, which is usually not appropriate. Instead, use cold packs for refrigerated transport.
- Special Cases:Some blood specimens have unique requirements. For instance, if you’re transporting blood cultures, they should be kept at room temperature (and upright) since they need to grow organisms. Cold temperatures could inhibit growth. Conversely, lactic acid blood tests often need iced water slurries. Always follow the test-specific guidelines for any special handling. When in doubt, consult the laboratory or test directory for instructions on transporting that type of blood specimen.
- Documentation:Ensure the blood sample’s paperwork (lab request) indicates the time of draw, and any preservatives used. For blood being sent out for specialized tests (like to an outside reference lab), include all necessary forms and note if the sample was centrifuged or if plasma/serum was separated. This helps the receiving lab process it correctly.
In summary, the appropriate method for transporting blood is to keep it cool and safe: use a biohazard specimen bag for containment, maintain 2–8°C unless otherwise directed, handle gently to prevent hemolysis, and get the sample to the lab quickly. By doing so, you preserve the blood specimen’s integrity, which is vital for accurate test results. Always remember that blood is a living tissue – treat it with care during transport just as you do during collection.
Conclusion: Ensuring Safety and Compliance in Specimen Transport
Properly transporting lab specimens is a critical responsibility in healthcare logistics. By understanding what lab specimen transport bags are and following best practices – from using the right packaging and WHO-endorsed triple packaging system to maintaining temperature and speed – medical professionals can ensure that every sample reaches the lab securely and in optimal condition. Adhering to these guidelines not only protects the people handling the specimens (through leak-proof, biohazard-labeled bags and proper PPE) but also protects the patients by preserving the sample quality for accurate diagnoses.
For hospital procurement staff and lab managers, investing in high-quality specimen transport bags and training staff in transport protocols is an investment in safety, compliance, and efficiency. Modern specimen transport bags come with features like tamper-evident seals, 95kPa pressure certification for air transport, and clear document pouches – all of which help meet regulatory requirements and prevent errors or accidents.
By implementing the steps and recommendations outlined above, your facility can streamline the sample transportation process and minimize risks. Always stay updated with the latest guidelines (from WHO, CDC, etc.) and refresh staff training regularly to keep compliance standards high.
If your organization is looking to enhance its specimen transport system, consider partnering with trusted suppliers for top-quality bags and containers. Our company, Adsure Packaging, offers Security Lab Specimen Bags that are designed to meet these stringent requirements – featuring tamper-evident closures and durable, leak-proof construction for peace of mind. Ensure every specimen arrives safely. Reach out to us to learn more about improving your lab’s specimen transport solutions and safeguarding the integrity of your samples from pick-up to delivery. Your patients and your lab results depend on safe specimen transport – and with the right tools and procedures in place, you can deliver that safety every time.
 Introduction